Gotta catch ‘em all!
The stuff of dreams is now reality. After years of wishing we could go on a real Pokemon adventure like the protagonists of our favourite games, the time has come. Pokemon Go his hit our shores, transforming sunny Singapore into a Pokemon paradise.
There could be a Pidgey or a Rattata waiting just around the corner, just waiting for you to add them to your PokeDex! Whether you’re a Pokemaniac or a casual fan, here’s our guide to having the best Pokemon Go adventure ever.
The Basics
I’ll spare you the details on the initial set up, because much like in the games, the Pokemon Professor of the hour (in this case, Professor Willow), will guide you through choosing your avatar and selecting your first starter!

Your starter choices are Squirtle, Bulbasaur, and Charmander, but if you want a Pikachu starter, dawdle at the selection screen and walk away from these 3 repeatedly – it’ll result in Pikachu appearing, and you can catch our favourite electric mouse.
You start off at Level 1, and as you complete activities and gain XP (experience points), you can level up. Each level up comes with bonuses, like new items. Plus, the higher your trainer level, the greater your likelihood of encountering rare Pokemon!
Now that you’re ready, here are some terms and important things to know about starting on your Pokemon journey. So strap on your walking shoes and let’s go!
1. Where to find Pokemon
Start by going around your neighbourhood, or heading to your nearest park. Some Pokemon are found in what would be their “natural” environments – like finding Goldeen in MacRitchie Reservoir, or fighting-types like Mankey at the Sports Hub. And if you’re looking for rarer Pokemon, like Dratini, head over to national monuments and landmarks. Who knows, you might find one at the Istana!

Pokemon are everywhere – you don’t need to be in tall grass to find them! Pokemon Go is still really new in Singapore, so no one’s really sure about where specific Pokemon hang out – the best way to find out is to head out and explore.
Plus, there’s no need to constantly look at your phone – the app will make your phone vibrate when Pokemon are nearby, so you can just whip it out when a little Zubat is nearby. Just remember that the app has to be open for this to work!
Here’s a nifty guide to where different Pokemon types are likely to be found!
2. How to catch ‘em all

Catching Pokemon in Pokemon Go doesn’t require any battling – just get your Pokeballs and go!
When a Pokemon appears and you’ve got a Pokeball in hand, you’ll see a circle appearing over them that serves as a target. Within that circle is another that shrinks, and the closer you get to the centre of that circle, the better your accuracy! You can get extra points for having good aim, and those go a long way in levelling up.
The colour of the circle makes a difference as well – Pokemon with green circles are easier to catch than those that are red or yellow.
You can name your Pokemon as well, any time you like!
3. What is a PokeStop?

Remember how in the original games, you would find random items in places like forests or buildings? PokeStops function in a similar way – they’re real-world locations that are usually points of interest, and visiting them allows you to collect items like Pokeballs and Potions. You might even find an Egg to hatch while you’re there!
PokeStops are everywhere, and if you’ve played Niantic’s other game, Ingress, PokeStop locations are likely to be Ingress portals as well. We’re not 100% sure where exactly all the PokeStops in Singapore are, but someone has made a pretty good guess!
When you reach a PokeStop, just swipe it to spin it and collect whatever items drop! The same PokeStop drops different items for different people, so keep going back to see what you get. You can go back every five minutes! It’s like the gift that keeps on giving.
4. Evolution time

Evolving Pokemon in Pokemon Go isn’t the level-grinding experience we remember – it’s much different!
In Pokemon Go, you can earn Stardust and Pokemon-specific candy by catching Pokemon. For example, if you catch a Pidgey, you get 100 Stardust and 3 Pidgey Candy. Each Pokemon has a specific amount of Stardust and Candy needed to power up and increase their combat power, as well as a specific amount of Candy they need for evolution.
There are several ways to get your hands on Stardust – aside from catching Pokemon, you get it when an egg is hatched, or when you collect bonuses from defending Pokemon Gyms!
Likewise, you only get Candy when you catch Pokemon of the same species, hatch them, or transfer them to Professor Willow! Just remember that once you transfer a Pokemon, they never come back, so be careful who you send to the Prof.
5. Eggs & Incubators

When I played the Pokemon games growing up, I occasionally wondered at the logic of carrying an egg around without breaking it. In Pokemon Go, all Pokemon eggs are stored in an Incubator, which makes much more sense.
When you start the game, you’re given an Incubator with an infinite number of uses. You can buy additional Incubators that have limited uses, if you want to hatch more eggs at one go!
Pokemon Eggs are found either at PokeStops or given as gifts when you level up, and different eggs have different distances that need to be covered before they’re hatched. The eggs either require 2km, 5km, or 10km distances, and the further you have to walk, the higher the chances of it being a rare Pokemon!
To hatch an egg, simply select it from your Pokemon menu and place it in an Incubator. Using your GPS, you can use your daily walks through Dhoby Ghaut MRT or up the stairs on campus to hatch your egg! Just remember to make sure the app is active when you go out in order for your steps to be counted.
After all the different campaigns the government has come up with to get us moving (remember ACES Day back in school?), it looks like Pokemon Go may be all we need to get moving.
6. Conquering the gyms!

This is the most exciting part of any Pokemon Trainer’s journey – taking on the Gyms! Gyms here work differently – rather than having a specific leader, they’re more like fortresses to be defended.
Once you’ve reached Level 5, you’ll be able to participate in Gym battles. There are pre-designated spots for Gyms, and the different teams can claim the gym and defend it from other teams.

Pokemon Go has three teams, Valor (Red), Mystic (Blue), and Instinct (Yellow), so pick the one you want and get ready to defend! Remember, once you choose a team, you’re there for good, so choose wisely.
If you find a Gym to claim for your team, you leave some of your Pokemon there to defend it. And if you find a Gym that belongs to your team, you can either Deploy a Pokemon to defend, or train by battling your teammates to strengthen the Gym and up its Prestige. The higher the Gym’s Prestige, the more Pokemon you can station there to defend it.
If you encounter an enemy Gym, here’s where the fun starts.
Upon arrival at the enemy Gym, you’ll be confronted with the Pokemon who have been left to defend it. You battle them from the weakest to the strongest, and if you defeat them all, the Gym’s Prestige drops.
Once the Gym’s Prestige drops to zero, it returns to being neutral territory – that you can then claim for your team, and get one step closer to achieving your dreams of (Pokemon) world domination.
7. It’s time for a battle!

Now, let’s go into how Pokemon battles work. When you confront an enemy Gym, you’ll be able to select and swap Pokemon to your party of 6, building a team you think is best for the battle.
When the battle begins, it’s time to go all out. Using your touchscreen, you can guide your Pokemon to dodge enemy attacks. Tap on your screen for your Pokemon to use their Fast Move, which is usually the first attack listed in their data.
And once the little blue bar below your Pikachu’s health bar is full, tap and hold to power up for their Charge Move. Fast Moves are quick, but Charge Moves, while slower, have much more power and deal more damage.
You can swap between Pokemon at any time during battle, so play to your team’s strengths!
Gyms are also one of the few places where you can get coins, which are used to buy in-game items like Incubators. You get Stardust and coins for defending your gyms, so check back every 20 hours or so to collect your bounty.
If your Pokemon are defeated in battle, they’ll be returned to you with just 1HP left, and you’ll have to heal your poor babies before they can be re-deployed.
8. Healing

Unfortunately, there are no Pokemon Centres and friendly Nurse Joys to heal your Pokemon post-battle. If your Pokemon are low on HP or have fainted in battle, you’ll need to use Potions and Revives to restore them. These items can be bought from the Shop, but the odds are, you’ll find plenty by visiting PokeStops.
9. Shopping for them items
Let’s talk about all the different items you can use in-game. Most of these items can be found at PokeStops or are awarded to you when you level up, but there are some worth buying.
First off, coins can only be obtained from defending Gyms, so you’ll probably have to spend some actual cash to get coins if you’re planning on making big-ticket purchases.
Here are some of the more nifty items you can buy with your coins:
Incense

You can use incense to attract Pokemon to you for 30 minutes, and it works even when you’re offline – so be sure to check your app and be alert.
Lucky Eggs

These gems double the XP you get for completing activities within a 30 minute window, making them extremely useful for trainer levelling-up. Be sure to use them if you’re going on a Pokemon capturing spree, as the amount of XP you can get is pretty wild.
Lure Modules
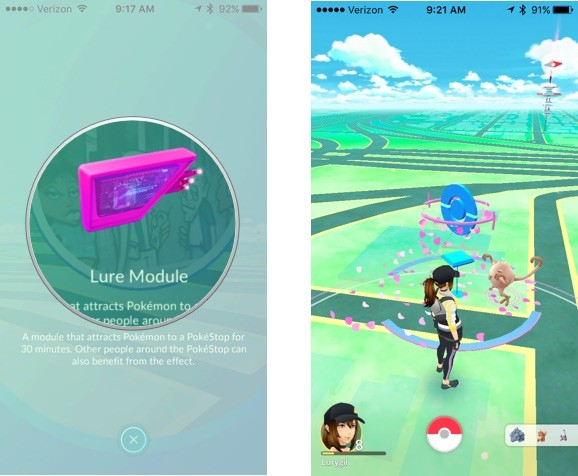
Lure Modules are pretty much Incense on steroids. Attach them to a PokeStop, and Pokemon will be drawn to that PokeStop, increasing your capturing chances and the possibility of seeing a rare creature.
When the Lure Module is activated, the PokeStop shows up in-game as surrounded by petals, and other players can stop by and reap the benefits of the Lure Module as well. It’s a great way to make friends, making you da real MVP.
Bag & Pokemon Storage Upgrades
If you’re the hoarding sort who NEEDS to have 200+ Potions and an endless supply of Revives, invest in Bag Upgrades to increase your storage space.
And if you have enough Rattata to take over Bukit Batok, but don’t want to transfer them to the Prof, you can buy storage upgrades to make sure you have enough space for all of them.
If you’re planning on spending cold hard cash on coins in Pokemon Go, here’s IGN’s guide to making the most out of your money.
Tips & Tricks
Now that you’ve gotten the basics of Pokemon Go all figured out, here are some handy tips for making the most out of your journey.
Battery and data-saving
1. Close all your background apps
This seems like a pretty basic thing to do, but you’d be surprised at how easy it is to forget. When you’re out playing Pokemon Go, make sure to close all your other apps so that they won’t drain your battery by running in the background!
2. Disable sound and dim your screen
Again, these go a long way in conserving your battery life. While Pokemon Go has an awesome soundtrack, tune in to it occasionally – you don’t need it while out on a hike searching for new Pokemon.
You can disable the sound in-app using the Settings tab!
3. Use ‘Battery Saver’ mode
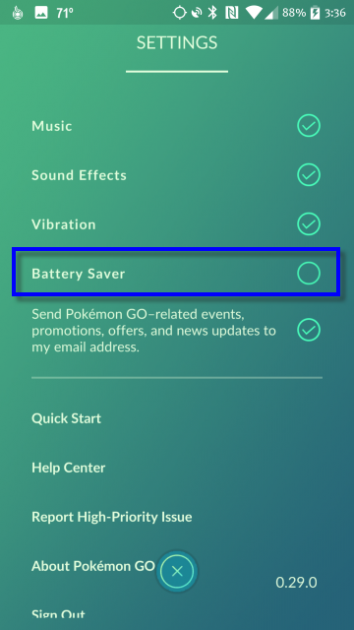
While you’re in Pokemon Go’s Settings menu, turn on its ‘Battery Saver’ mode as well. With this activated, you can simply hold your phone upside down, and the screen will darken with only a faint Pokemon Go logo visible.
In this mode, you can’t see anything, but the app is still active and tracking your location, if you’re hatching eggs or taking a stroll. It’ll vibrate to tell you when Pokemon are nearby, and it beats minimising the app, which doesn’t give you notifications or track your movements.
4. Turn off AR mode

Yes, it is supremely cool to see a Pidgey hopping around on your kopitiam table next to its not-so-cool pigeon cousin, but it also drains your battery like crazy. To maximise your battery life, turn off the AR mode when you’re out playing!
This is also useful if you’re out playing in a crowded area, because AR mode requires you to aim your phone camera. And there may be a not-very-happy auntie standing right next to your Venonat, who might not take kindly to your Pokemon-catching antics. To avoid any unfortunate encounters with NPCs of the human type, switching off AR helps loads.
5. Play while connected to WiFi
If you’re playing on campus or in a place with pretty good free WiFi, spare yourself from bursting your data by connecting to the WiFi. It’s easy to forget to do this when in the thick of the game, but it helps tremendously.
6. Powerbanks save the day

You can even carry around this Pokeball powerbank to really get in-character
And if all else fails, be sure to have your powerbank on hand to save the day – and in this case, the bigger your powerbank, the better.
This is especially useful if you’re planning on a long walk or being out all day, and will save you from the woes of making that last 5% of battery last till you get home.
Powering Up
1. The Great XP Breakdown

Levelling up as a trainer means more items and more Pokemon to catch, so here’s the breakdown on what activities get you the most XP.
Capturing a Pokemon: 100 XP
Capture Bonuses (for throwing Pokeballs with skill)
-
Nice: 10 XP
-
Great: 100 XP
-
Excellent: 100 XP
-
Curveball: 10 XP
Hatching a Pokemon:
-
2KM: 200 XP
-
5KM: 500 XP
-
10KM: 1000 XP
Evolving a Pokemon: 500 XP
Registering a new Pokemon in your Pokedex: 500 XP
Check a Pokestop: 50 XP or 100 XP (if there are six or more items)
Training at a Gym: Depends on your success
Battle Pokemon at a Gym: Depends on your success
Two of the fastest ways to get XP is to go on a capturing spree or an evolving spree, so activate your Lucky Eggs before doing so to get the most XP!
Finding Pokemon
1. Summon nearby Pokemon
[UPDATE: This function has since been removed with the version 0.31.0 update. Which means we no longer know where our nearest Pokemon are!]

Whenever you’re walking around, there’ll be a small tab in the bottom-right corner filled with Pokemon. Tap on it, and it’ll show you silhouettes of the Pokemon in your nearby area. If they’re greyed out, it means you’ve yet to encounter them, but if they’re coloured in, you probably have some in your team already.
The number of footsteps under the Pokemon indicates their proximity – the smaller the number of footsteps, the closer they are to you! All the Pokemon are within walking distance, so don’t worry, you won’t find yourself walking from Simei to Pasir Ris just for the sake of a Ponyta.
You can “summon’’ nearby Pokemon by tapping on the ones you want to see. This will increase the chances of an encounter!
2. Play “hot or cold”
The footsteps in the tab indicate how close or how far a Pokemon is, so if you’re up to it, you can play a game of strategic trial and error to track them down.
Simply walk around and use the number of footsteps to gauge your distance – once the number of footsteps drops to zero, you’ll find that Pokemon.

Catching Pokemon
1. Throw a curveball

To get bonus points when catching Pokemon, spin your Pokeball until it sparkles, and then let it rip! You can get extra XP for catching Pokemon with a curveball.
It also helps to throw the ball in the opposite direction that you’re spinning it in. So if you’re spinning your Pokeball clockwise, be sure to toss the ball to the left in for greater accuracy. The jury is out on exactly how effective it is, but it’s definitely worth a shot.
2. Save those Pokeballs!

This doesn’t seem to work for everyone, but if you screw up a throw and miss, tap on it before it disappears in order to recover it to avoid wasting your Pokeballs.
Again, this seems to have mixed results, but it’s definitely worth a shot. But if it doesn’t work for you, worry not – there are plenty of Pokeballs to be found at your nearest PokeStop, and you can buy them from the Shop if you really need to.
3. Razz Berries to the rescue

Much like how we all enter a food coma after eating, feed wild Pokemon Razz Berries to increase your chances of successfully capturing them.
Just select the Razz Berry from your bag, and throw it at the Pokemon – don’t worry about missing, Razz Berries have a 100% accuracy rate. And once that’s done, let the Pokeballs fly.
Razz Berries are useful for conserving Pokeballs, and especially to avoid using up your supply of Great Balls and Ultra Balls, but they’re also useful in making sure you catch that elusive Dragonite you’ve been hunting for weeks.
Becoming A Battle Champion
1. Check your Pokemon’s moveset
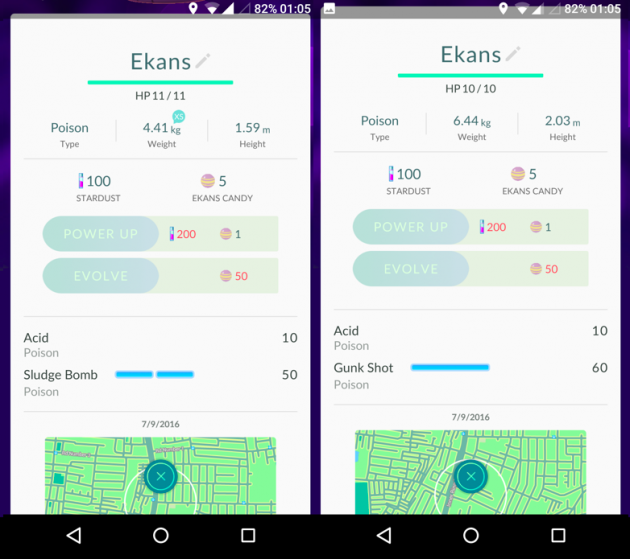
If you have multiple of the same Pokemon, take a good look at their movesets. While it makes sense to choose the ones with higher Combat Power (CP), the moves make a difference in battle as well.
For example, if you have one Staryu with 98 CP and the other with 100 CP, but the weaker one knows Psybeam and Water Gun, and the stronger one only knows Body Slam and Tackle, you’ll want to go for the Pokemon with the better moveset that deals more damage.
Weak Pokemon can get stronger – but moves are forever.
2. Boost your Combat Power!

CP makes all the difference, especially in a gym battle. Let’s be real, a tiny Rattata with 200CP can take down a Pidgeot that has only 100CP easily, even if Rattata are technically seen as weaker.
The easiest way to boost CP is to give your Pokemon Candy and Stardust, but Pokemon also get a CP boost every time their trainer levels up. See, this is why it’s so important to maximise all the XP you can get.
3. Be careful with your Candy

People are still experimenting with the best ways to evolve your Pokemon, but it definitely pays to be careful with how you use your Candy.
Each Pokemon has their own specific candy required to evolve, as well as different Stardust and Candy requirements to power up. If you keep powering up your Pokemon without evolving, it’ll take longer to accumulate the candy needed for evolution.
If you can afford the wait, evolve your Pokemon before powering them up. This allows you to maximise your Stardust and Candy usage!
Remember, you can get Candy by transferring duplicate Pokemon to the Professor, so it’s a good idea to do that if you have a Zubat army gathering in order to power up or evolve your Zubat to Golbat.
Bonus tip: Collect a lot of candy, and then evolve multiple Pokemon at the same time, preferably with a Lucky Egg activated. This doubles your XP like whoa.
4. Play to your (type) advantage

As it is in all Pokemon games, type advantages play a huge part in winning Gym battles. In general, it works a lot like rock-paper-scissors – fire defeats grass, but grass is strong against water, and water has an advantage over fire.
It gets more complicated once you add in all the other Pokemon types, especially ones like Psychic and Fairy. Here’s a handy guide that breaks down all the different type strengths and weaknesses for you, if the chart above is just too confusing.
5. Take on Gyms in teams

If you’re walking past a Gym and see sparks and explosions over it, it means a battle is taking place, and you can join in on the action!
And if you and your friends are out on a Pokemon adventure together, take on a Gym together. It’s far more effective, and you can deal loads more damage to the enemy Gym’s Pokemon. Remember, when you work together, it’s much better!
Taking on Gyms as a group lets you defeat Pokemon faster – that enemy Gym’s prestige is going down.
Hatching Eggs
1. You gotta walk, bro

If you think you can activate Pokemon Go, leave it in your pocket, and drive down the PIE in order to hatch your eggs, think again. The app is smarter than you think, and it knows how fast you’re going and if you’re actually moving – the only way to hatch an egg in a car is to crawl down the street, and that’s a massive waste of gas.
I’m not sure about MRTs and buses, and whether or not you can hatch eggs using your daily commute, but the most effective way is to take Pokemon Go with you on foot or by bicycle. Whether it’s your daily treks to get to class or cycling at East Coast Park, those are the best ways to make sure you clock in the miles to hatch your eggs.
2. Distances make a difference

When you receive an egg, you’ll notice that each egg has a distance that needs to be covered in order for it to hatch. There are 2KM, 5KM, and 10KM varieties, and the general rule is that the further you have to walk, the rarer the Pokemon.
In general, don’t spend too much time trying to hatch eggs that belong to the 2KM category, as they’re usually common Pokemon that you can easily find. However, the XP bonuses you get for hatching eggs is pretty substantial, so don’t discount them entirely.
There are plenty of resources on egg hatching, and some folks on Reddit have come up with a chart to show you what the distances required for different Pokemon are, similar to the image above. I can’t vouch for its accuracy, but it gives a pretty good idea of what you can hatch.
Getting Items
1. One PokeStop, many items

PokeStops have a cooldown time of about 5 minutes, which means that you can collect items from the same PokeStop an unlimited number of times, every day!
If I’m walking out to buy lunch and collected some items from a few PokeStops along the way, I can pass by the same PokeStops on my way back to the office and collect more items. The world in Pokemon Go is basically resource-rich and wonderful – in this game, there is such a thing as a free lunch.
2. Forward is not the only way

If you see a PokeStop and it’s just a little bit out of range of your GPS (or in a place that would be trespassing to enter), there are several ways to avoid having to actually walk towards it in order to get within range.
Start by connecting to a local WiFi network if possible – your phone will think that you’re near a WiFi hotspot, which can mislead your GPS into thinking you’re closer to the PokeStop than you really are.
Alternatively, try backtracking and finding an alternative route to access the PokeStop. Because you don’t have to be directly in front of it to access its items, you could reach a PokeStop by climbing up to an overhead bridge to bring you closer, or by heading up a HDB flat.
3. Make use of your daily commute

If you take the bus to work or school, take advantage of your bus ride to collect items from PokeStops or even catch some Pokemon. Because you only need to be in range, you can easily access PokeStops near bus-stops while waiting for people to board and alight.
Additionally, most MRT stations are likely to be PokeStops as well, so you can easily pick up new items during the peak hour rush.
The same applies if someone’s driving you and you’re waiting at the traffic light – take the time to see if there are any nearby PokeStops for a quick supply run or Pokemon to capture.
Safety warning: DO NOT play Pokemon Go while you’re driving. Your safety, and the safety of others, is far more important than finding a Jigglypuff. If you really need a car, consider getting someone to be your Pokemon Go chauffeur – stay safe!
Ready, set, Pokemon Go!

Armed with your newfound knowledge on how to have the best Pokemon journey ever, it’s time to explore the world and track down some Pokemon. The game is also constantly being upgraded and improved, so if you discover any new tips and tricks, share them with us to benefit trainers all around 😀
Remember to stay hydrated, be aware of your surroundings, and most importantly, have fun! It’s time to become a Pokemon Master.
